MicroMaxx Gallery

The Rocketry Forum

Help Support The Rocketry Forum:

This site may earn a commission from merchant affiliate links, including eBay, Amazon, and others.
When the Solar Flare was released last year I knew it was gonna have to be downscaled.
I wasn't at all sure we'ed have a booster motor so decided to just make it a single motor downscale. Looking to a Clear payload tube about the right size was one of the main stumbling blocks that kept this model on the drawing board for a long while. clear Polyethylene mailing tube ended up being the closest fit I could find which was just a tab oversized.
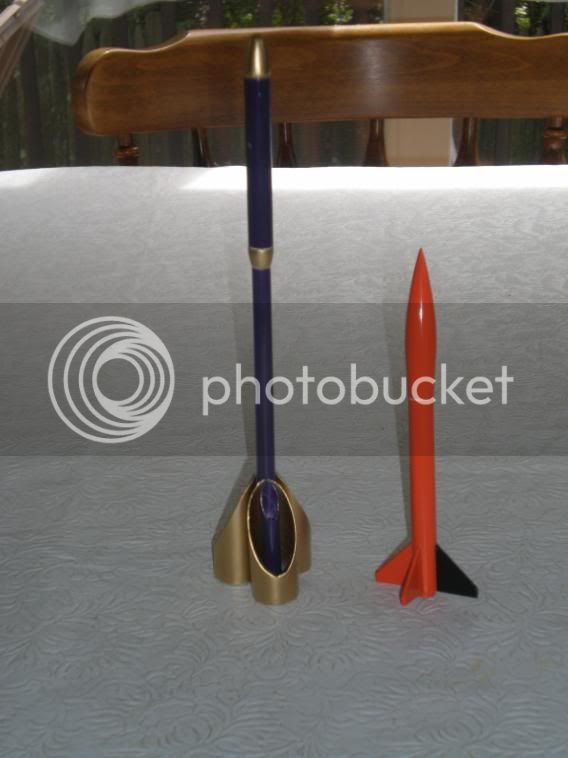
Shes on the large side in T3 main body .375" tubing and over 10" long with a BT-55 coupling used as the fin ring. After a good amount of thinning this coupling took a lot of filler and sanding to get s decent finish, which also added a lot of mass. Basswood custome turned nosecone with added #9 shot nose weight and 1/16" fins all added up to a model tipping the scales at 14.1g. add some internal things and a 3/4" x 18" orange teflon wadding/streamer and a MMX-II motor we had a Heavy 15.2 gram LOWt. Just a bit much from this design.
I've redesigned this model for T2+ just haven't gotten around to building it yet.

MM 361p01f2-sm_T-3 Micro Solar Flare_01-12-09.JPG
 
Now that we have a legal (delayed) booster motor MMX-II-NE more and more staged micros are coming into being.
This 2X downscale of the old Estes Midget 2Stage from back in the 70's makes a prefect platform for flying these motor combinations.
It is strongly suggested with any 2-Staged micor that upper stage sustainer be painted with Very bright colors and have a Streamer or Chute to helps in spotting at some very HIGH altitudes.
The upper stage of my Midget has been completely out of sight for 12
+seconds in the past with a 3/4" x 12" orange teflon streamer/wadding. several pair of eyes on both stages is a really good idea:)

MM 362uc13b_MMX-II-NE Booster Friction fitted_09-17-09.JPG

MM 362uc13c_Sustainer & Booster 1st Flt Ready_09-17-09.JPG

MM 362uc15_MM T3-T4 Midget 2-Stage_03-30-10.jpg

MM 362Lp01a_MM T4 MM Midget 2stage on Pad_09-19-09.JPG

MM 362Lp01b_IMI! MM Midget 2stage smoke Trail_09-19-09.JPG
 
Ya just gotta LOVE this little 3 model Kit from Fliskits!

Just barely big enough to hold the motor...just kidding! they are minimum diameter T2+ (.281") dia. x 3.25" long with a 1-5/8" fin span. Balsa Nosecone and 1/16" fins keep them super light. I build all three and they all came out 1.9grams each after a couple heavy coats of Fluorescent paints (hoping it would help during recovery).
I should have followed my first inclination to leave the NC loose and add a short shockline and tiny teflon streamer. As I've already lost one on it's second flight:( Even with 30+ people watching the HEAD JURKING liftoff noone saw the model at or after ejection. an extensive search didn't come across the tiny model either. ON it's first flight I happened to catch the model streaming in fairly close to the launch pad.
Fun Flights... with a Capital F! Kid screaming WOW!!! If you don't mind lossing them fairly quickly:)

MM 363p02a-c_MM 3 Big Honkin' Rockets_03-30-10.jpg

MM 363Lp01a_MM Big Honkin Rocket ready_09-19-09.JPG

MM 363Lp03c_Big Honkin Rocket on Pad_08-21-10.jpg
 
Last edited:
in an effort to fill out the Payload model/motor range the NAR contest Chair and Provisional events chairman ask if I would consider attempting to design a Payload and a few sample models for the 1/8A, 1/4A and 1/2A Payload events.
First a suitable payload was needed so I started off with a 1/4oz paylay actually 7.1grams in a standard 2.75" long T2 dia. tube. filled easily with #9 lead shot....which went over like a lead balloon with the NAR contest committee LOL!!! Has to be a NON-matellic filler they said. So back to the drawing board. it took almost a year to come up with a combination of Play Sand and epoxy that would allow a 3.5grams (1/8oz) payload to be fitting into a standard length 2-3/4" long T2 tube.
This Payload fits quite nicely in a standard T2+ minimum diameter micro maxx body tube, for flight with a MMX-II Motor. gets very nice altitude and should be something the masses can work with.
I've set mine up to eject a streamer the brings the model back at a safe decent rate that can be flown again and again.
1/4A flies with 2- 3.5gram payloads and 1/2A with 3. So far it's been flown a couple times but I haven't hear any results yet.

MM 364-a1-a_MM Pee-Wee Payloader & 2in 7g payload_07-02-04.JPG

MM 364-a2-b_PeeWee Payloader.125A T2+(1-3.5g load)_10-13-09.JPG
 
Not sure how many of you would be familar with Robert Edmonds "Deltie Airshow" 4 glider model but it's a real hit weather flown day or at night with a few cylume fishing lure glo-stick CA'ed to the underside of the fuselage.

Well we micro flyer's now have an equally impressive, slightly harder to trim, but very fun to fly...(With LOTS of other people watching) Micro 3 Glider Airshow. Well at least in the daytime....
This model is a real pleasure to build. a little tough to trim, but one they are trimmed (To Circle) just a JOY to watch in the air.
I flew mine on an OLD MMX-I .21 Ns motor for it's first flight with 3 other helpers watching for the gliders and core vehicle. Wow! still very high flight, Pop and all three gliders began circling the streamer recovering mother ship.
We found all three gliders within 6 feet of the streamered core.

I recommend flying this model ONLY with 0-3 mph breeze. On the second flight with a 5-8 mph breeze the model boosted straight as an arrow on a MMX-II motor to perhaps 120-140feet, popped the NC and streamer. all the gliders took off and spread with the wind:( Circling but in MUCH larger arcs. Got the core and 2 of the 3 gliders back but we believe the lost one actually Thremalled UP and away out of sight pretty quickly.
I've since replaced the glider with another but haven't had a still enough air day to try another MMX-II flight.
A very colorful display in the air with little wind:)

MM 365p01_MM 3's A Charm (Flis 3 glider Micro AirShow)_03-30-10.jpg

MM 365Lp01a_3's-A-Charm closeUp ready for 1st flt_03-20-10.JPG
 
Heres a pretty easy build, Futuristic design Fun flying kit from Fliskits.
The MMX Flis Dead Ringer is a minimum dia (.281") x 8-5/8"long nifty little rocket. 3 ring fins with elegant support structures make for a good looking model as well.
Completed & painted Ewt for my version came out at 9.8g giving a LOWt of 10.9g after my usual heavy up and lengthening of the shockline and switching to a 1/2" x 12" yellow Teflon streamer/permanent wadding.
Very nice flying model, does tend to weathercock in breezes over 10mph still flys well.

MM 366uc01a_Flis Dead Ringer Parts & options_02-23-10.jpg

MM 366uc06a_.5inx12in Teflon& 36in90lb Kevlar_02-26-10.jpg

MM 366uc10_MM Flis Dead Ringer_03-30-10.jpg

MM 366Lp01a_Flis Dead Ringer MMX on pad_03-20-10.JPG

MM 366Lp01b_Flis Dead Ringer MMX midFlt_03-20-10.JPG
 
Glad you're enjoying the 3's-a-Charm

:) I had a ball putting that kit together but had to fly it about 3 times before I could retrieve all 3 gliders to confirm a good flight LOL
 
When it comes to pretty Nifty designs Jim Flis has come up with some winners.
The Micro Maxx Stinger is another of those kits.

It also make a lot of sense to READ the instructions before building as he sometimes throws in a curve or two LOL!!!
If i'd bothered to read the instrucitons with this first stinger kit I might have seen I was supposed to cut off part of the T3 main body tube. Believe it or not I didn't even notice the difference until the model was completely primed and sanded... I was more involved looking at the rear of this bird and PLOTTING how Stinger-b was going to be a 3 motor in-line cluster.
Still at a tad over 7inch long the Empty weight was still only 9.2grams so I didn't cut off the foreward end. Flys fine just looks a little odd.

The lesson here is to READ the instruction on any kit... the Author almost always cover little things like this right at the beginning LOL!!!

MM 367uc01b_36in x 90lb Shockline installed_02-26-10.jpg

MM 367uc05a_rough-Up exterior of LL with 80grit_02-27-10.jpg

MM 367uc12_Stinger_Rustoleum 7271 Silver Metallic_03-18-10.JPG

MM 367uc13_MM Stinger (Long)_03-30-10.jpg
 
I Knew the Stinger would make one heck of a Cluster conversion candidate and as it went I'm sure you'll agree it sure does.
With our fairly new MMX-II-NE (sorta booster) motors we have a perfect opportunity to get a lot better altitude from this classy looking model.

Adding a couple 1" sections of T2+ and Epoxy coated ends of T2+ balsa blocks a bit of careful circle cutting two new ports in the rear bulkhead and reducing the Main fin span by the width of the booster motor tubes and standoff. AND CUTTING THE REQUIRED 1.5" FROM THE T3 BODY TUBE. we only added .5g of mass to the overall vehicle. Just to be sure we didn't alter the CP/Cg relationship I dropped in 5 #9 shot to the hollowed out Nosecone along with a 90lb kevlar loop and a tad bit of epoxy.

Finished this one with the same Rustoleum Silver metallic metal flake base and Copper flake accents.

For the first flight, I used pyrogen tipped Q2 igniters and my rangebox relay setup just to be sure. had Better 2/3rds and daughter watching along with my grandson and quite a few club members. 5..4..3..2..1...WOW! it was just GONE! teleported to about 130+ feet, popped the streamer and was well on the way backdown before anyone saw it! Talk about your head snapper! All I got was a smoke trail....WOW now that was WAY KEWL!!!

MM 367b-04_Extra Parts for Cluster_04-17-10.JPG

MM 367b-18a_Test fit booster tubes_04-17-10.JPG

MM 367b-21a_Rear Bulkhead attached_04-18-10.JPG

MM 367b-cp36d_3 Motor Cluster Stinger (Futured)_05-03-10.JPG

MM 367b-Lp01b_at field on pad with relay_06-19-10.JPG
 
One of my only Soviet flagged rockets. the Wolverine is a classic design that needed to be built.
A smallish downscale at T3 (.375") diameter, is only 4.5inchs long. Needless to say with an Ewt of 4.5g and a LOWt of 5.6grams this little bugger really moves. Far to quick for my camera to catch anything other then smoke LOL!

Can say enough about Rustoleum #7172 Metallic Silver, What a great Metal flake rattlecan find!
Fun flying downscale!

MM 368-a_MM T3 Wolverine Side Decaled_05-08-10.jpg

MM 368-cp05_MM Wolverine 7172 Metallic Silver_05-01-10.JPG

MM 368-cp06b_MM T3 WolverineTopFrt Decaled_05-08-10.jpg
 
Another Estes downscale from the more recent vintage is the 3.5x reduced T3 (.375") main body Guardian.
5-9/16" long the model has enough presence to really look pretty good in rustoleum Metallic Black,Silver & white. Alps printed decals being transparent colors worked out well over both white base coat and metallic silver fins. Printing over silver foil help the guardian body decal snap over the metallic black.
Light at 4.7grams with a MMX-II Motor our LOWt is 5.8grams making it another neck jurker, Snap quick teleport to apogee flight some 150+ feet about the launcher.

MM 369-cp01_MM Guradian Construction Complete_04-16-10.JPG

MM 369-cp04_MM Guardian 3 tone Silver fin-Blk & white_05-01-10.JPG

MM 369-cp05_MM Guardian Decaled Complete_05-08-10.jpg
 
This model was a trip to build! it's actually a Downscale of a much Larger (Parts Bash - 6 motor standard size) model built for a club contest last year.

Max diameter of .736 (BT-20) gave me plenty of room for the core 4xMMX cluster, with two T2+ side pods holding MMX-II-NE booster motors. the base unit transitions to T2+ the out agian to T3 in the crew quarters area.
Fins are 1/32" basswood tipped with laser cannon, forward missle pods and other surface detail and antenna arays help give the model the Space transport feel.

As you might suspect with all these parts and pieces this little beasty is on the hefty side. during swing testing 8.3 extra grams of Nose weight had to be added...that's more then most of my single motor Micro models weight before flight LOL. Empty mass with 8" mylar chute. is 26.5g.(.94oz).
Add 4- MMX-II main motors and 2- MMX-II-NE boosters our total vehicle LOWt tips the scales at 33.6grams (1.19oz).

Since completion last October we haven't had a decent change to fly it. Hopefully it should get it's change very soon.

MM 370uc06_4 fins in tissue sandwich_05-21-10.JPG

MM 370uc07a_MM body parts together_05-22-10.JPG

MM 370uc07b_business end 6 MMX cluster_05-22-10.JPG

MM 370uc17a_ready for 1st primer_07-03-10.JPG

MM 370uc26_Cosmic Cluster Complete_11-14-10.JPG
 
Last edited:
Over the winter I added this 2X downscale of Eric Truax 2008 Holiday bell to my collection of Christmas Odd-Rocs.
As with Eric's this one is all light cardstock with the only added Model rocket parts being 30" of 90lb Kevlar and a 1/2" x 12" yellow teflon wadding/streamer.
I have to say these bells are A BALL to fly regardless of size. Goes up like a shot. the seems to ring (if the had a clapper) under the streamer coming down. Very KEWL flight and recovery:)

MM 371p01_MM T2++ Christmas Bell_11-28-10.JPG

MM 371p02_Micro & 482 18mm Christmas Bells complete_11-28-10.JPG

MM 371Lp01a_MM Christmas bell on pad_12-18-10.JPG

MM 371Lp01c_MM Christmas bell @ ignition_12-18-10.JPG
 
Somehow missed this model back in the day.
It's such an interesting design I decided that I'd downscale it for Micro Maxx flying.
Base on T3 and T5 Standard tubing the T2+ motor mount core tube worked out perfectly.
12 offset fins make the head-on view worth looking at. from the side this arrangement is lost by the distance between the fins.

I've left the PNC-5V Nosecone unpainted to allow future addition of a light weight high mcd LED and tiny Lithium battery for night flying;)
Being a pretty new member of the fleet i haven't had time to fly this one yet....perhaps if we get a break in the weather.

MM 372uc03b_ASM CloseUp interstage detail_02-04-11.JPG

MM 372uc04_ASM head-on 12 fin View_02-04-11.JPG

MM 372uc10b_T3-T5 Airborne Surveillance Missile_04-17-11.JPG
 
Oh man! Back in the early days I wanted the Galactic Pirates models big time. But as with many at the time I had many other things directing time and resources:( As with some others these I just missed.
Recently I decided to do 3x downscale of both the Galactic Priates Patrol cursier Excalibur and Dreaded Dragon Ship-7.
Both based on Bt-5 as Micro models they are on the hefty side.
Patrol Cursier Excalibur finished fully loaded for battle has a Liftoff weight of 11.2g. While I'm not expecting high altitude It'll be great to see it in the air.

MM 373cp01a_ tiny tubes around T2+ MMT_07-30-10.JPG

MM 373uc03_Excalibur LR view_02-06-11.JPG

MM 373uc10b_MM T5 Patrol Cruiser Excalibur_04-17-11.JPG
 
If ya build one it's only natural to want the other. Back in the day I was never very keen on the Dreaded evil villain Vehicle "Dragon Ship-7".
Since I was doing one in micro scale I figured I'd do both just for fun.
Again 3x downscale brings it to BT-5 size.

figuring out a good way to roll the tiny 1/8" OD exhaust tubes was fun using an 1/16" hardwood dowel as the mandrel, white glued and computer paper stirps. the remainder of the model was pretty much a standard build.

I have to say building both of these micro models was both a challange and really fun right up to doing the Decaling..... producing and applying all those Rivet dot applications was to say a super pain in the rear is putting it very very mildly.
To inhance the sinister look I went with a slighter darker Gray the the Light gull gray suggested. I was hoping it would help the red and yellow flame decals stand out a bit more.
With all the fins and other add-ons this one is truely a little PIGGY. Ewt of 11.4g should give it a LOWt of around 12.5g. Fat and heavy I'm not expecting much in altitude but needs a good flight. Hopefully this weekend.

MM 374uc06a_Canopy & main fins on_02-26-11.JPG

MM 374uc10a_Gun barrels topview_02-27-11.JPG

MM 374uc13c_Dragonship uncovered_03-13-11.JPG

MM 374uc14a_Dragon Ship-7 Decaled_04-17-11.jpg

MM 374uc14b_MM T5 Dragon Ship-7_04-17-11.JPG
 
Another of the model kits that were destroyed by vandels in my storage room was the unopend box from Estes Aerospace Club.
Since I never got to build the full size model I chose to downscale it to T3 (.375") diameter and fly it on micro motors.
In my haste to get this model completed I truely didn't catch the mis-spelled word until far after the decals were dried...actually first noticed the mistake while applying future. So you know it ain't gonna get changed anytime soon LOL!!! I did correct the 1-page plan so anyone wanting to build a T3 Viper can do so without the orignial downscaling goof:)

Ended up hand brush painted the magenta nosecone with ONE shot pearlescent enamel as no Magenta rattlecan could be found.

MM 375uc05_1shot Magenta pearl painted NC_03-13-11.JPG

MM 375uc06c_eac VIPER Done_04-17-11.jpg

MM 375uc6d_MM eac  VIPER T3_04-17-11.JPG

MM 375LP01_eas Viper on Pad 1st Flt_05-21-11.JPG
 
One of Aerospace Specialty Products (ASP) Micro scale kit offerings.
a very simple, well thought out kit with good instructions. Not one of my better finishing jobs after having a Liquid mask rubber problem that softened the underlaying rustoleum Gloss White base color. After more then a week the softened white hadn't re-hardened so I decided to remove it to start completely over. the reducer used to remove the paint however started attacking the styrene parts so I had to stop only part way in the process. this left lots of yucky areas that still wouldn't harden or sand with a crap.
Totally frustrated with the thing I said Poopus-Nunee on it...recoated it with the same white and hand painted the black. applied the decals calling it a rocket... Sometimes things just won't work out LOL!!!
the little model should still fly fine, even if it looks like crap on a white rag.

MM 376uc08_styrene conduits on_02-19-11.JPG

MM 376uc09_Hawk done_Launch lugs on_02-19-11.JPG

MM 376uc13_MM Hawk repainted white_05-13-11.JPG

MM 376uc14a_MM Hawk Blk Hand paint & decal_05-14-11.JPG

MM 376uc14c_MM Hawk Missile_05-14-11.jpg
 
Being one who has never been much into Olive drab painted model rockets, I have resisted buying or scratch building many Military Missiles for just that reason.
HOJO is a perfect example. BUT some of the TEST round paint patterns are much more interesting. Fliskit's 1/80th +/- M31A1 Honest John is as usual a very nice basic kit. With just a couple extra tiny add-ons it's even more pleasing.
Adding 3D Spin motor housings to the model and a few paper weld & attachment bands really adds to the overall look of the model. 3 color paint job is a little bit of a pain but worth the time.
Great little model Jim!

MM 377uc05a_Shaping 3- Spin Motor nozzles_03-06-11.JPG

MM 377uc05b_Attach to NC with CA_03-06-11.JPG

MM 377uc06_Bands & nozzles ready for paint_03-06-11.JPG

MM 377uc13c_.5 x 12 Teflon streamer on 5.2g_04-28-11.JPG

MM 377uc13d_T3 1;80 Honest John Complete_04-28-11.JPG
 
Last edited:
These next two Micro Odd-Rocs were just Plain fun to design and build.
No they are not metal at all.
MM 378A is a Full Scale 3/8"x 6" Machine Screw, Hex Nut & Fender Washer design built out of mostly standard mod-roc parts.
MM 378B is a Full size 3/8" x 6" Althread Stud, triple Hex Nut & Fender Washer design.
All threaded portions on both models are 3/8" OD Clear Polycarbonate thin wall tubing that was threaded with a standard metal threading die. All Nuts and Hex Head for the MS are 22lb High density Foam laminiated with paper. all three nuts for the stud were tapped 3/8-16 to match the threaded tube Epoxy fixed in place after tightening in position. Finder Washer (Drag Fins) are 1/16" clear polycarbonate.
Both were primed and painted to simulate Stainless Steel hardware.
So far I've only had a chance to launch the Stud.. A semi success as it hung on the rod a bit slowing it's takeoff causing not enough speed to keep the drag fin working. We'll adjust the launch lug holes drilled in the nuts and perhaps have to add a mid point clear LL to help keep everything moving forward LOL!
As mentioned they were both really fun to design and construct, a little on the heavy side with liftoff masses of 9.1g and 10.4g.
They sure got a lot of second looks laying on the launch table last weekend.

MM 378-A_MM MachineScrew,Nut&Washer Odd-Roc_05-17-11.jpg

MM 378-B_MM Stud, Nuts&Washer Odd-Roc_05-17-11.jpg

MM 378uc08e3_1 0f 3 Stud Nuts threaded_05-08-11.JPG
 

Attachments

  • MM 378BLp01b_Stud,nut & Washer Midflight_05-21-11.JPG
    MM 378BLp01b_Stud,nut & Washer Midflight_05-21-11.JPG
    217.1 KB · Views: 21
One of the newest members of the Micro Maxx Fleet is the T3 DarkStar. A Great flying little Downscale.
Nothing really specal about this build Other then the Finishing with a fairly new Anodized Aluminum look metallic rattle can paint from Krylon called X-Metals. Must be used over Shiney metal base or their Metallic fine metal flake Conversion Base coat. but man do these transparent colors Pop in direct sunlight.
Nifty little flying model as will.
 

Attachments

  • MM 379_MM T3 DarkStar_05-17-11.JPG
    MM 379_MM T3 DarkStar_05-17-11.JPG
    256.5 KB · Views: 23
  • MM 379Lp01a_DarkStar on pad 1st flt_05-21-11.JPG
    MM 379Lp01a_DarkStar on pad 1st flt_05-21-11.JPG
    294.9 KB · Views: 17
  • MM 379Lp01b_DarkStar Mid Flight_05-21-11.JPG
    MM 379Lp01b_DarkStar Mid Flight_05-21-11.JPG
    153.6 KB · Views: 20
Just after Quest announced they had the MMX-II-NE motors in for certification. I wanted to see what the average delay would do to a slightly heavier then usual 2-stage micro. I had a bunch of 10.5mm competition PD/SD models left over since the Apogee 10.5mm motors has been pulled from the market.
So a retro fitted a couple with MMX motor mounts and built some Booster stages for use with the test motors I had just recieved.

Seems they work just fine as booster motors as long as you keep the overall mass down... Though that delay can be a heartstopper....seems the average .857 second delay lasts an eternity between burn out and start-up of the sustainer.. but it works LOL!!!

MM 400_.448in dia x 8in MM 2-staging Tests_02-09.JPG

MM 400exLp01a_MMX-II-NE_MMX-II on pad_03-03-09.JPG
 
Partial fleet pic.

573af7b0.jpg


Micro Onyx

MicroOnyx2.jpg


Bullseye

BuckShot2.jpg


Micro Nuke

MicroNuke2.jpg


A few FlisKits micros

FlisMMXFleet20071.jpg


FlisMMX4.jpg
 
Some very Nice looking Micros there Keith!
I only wish I lived a little closer to you guys so we could fly lot's of Micro's together:)
Keep em coming, Love to see EVERY micro made and flown.

Ps: I'm working on 3 flistkits myself at the moment;)
 
Some very Nice looking Micros there Keith!
I only wish I lived a little closer to you guys so we could fly lot's of Micro's together:)
Keep em coming, Love to see EVERY micro made and flown.

Ps: I'm working on 3 flistkits myself at the moment;)


Thanks John and Jim. Would be very cool to get out and launch. Health right now prevents me from getting to a club launch. I hope to do a little micro launching out on the front lawn this weekend. I agree if we were closer it would be a lot of fun to launch together.

Keith
 
Thanks John and Jim. Would be very cool to get out and launch. Health right now prevents me from getting to a club launch. I hope to do a little micro launching out on the front lawn this weekend. I agree if we were closer it would be a lot of fun to launch together.

Keith

Sorry to hear about the health Issues... Hope they resolve to allow you alot more access to club launches real soon;)

Til then theose front lawn Micro flyings should give the BP fix we sometimes need...I know it sure works for me on the worst days.
 
It's been a couple months since I've had some free time to work on micros. Tied myself up reworking a bunch of Night Launch vehicles and club night launch support items for September 24th. Keeping everything I have two of crossed the weather cooperates for this coming Saturday.

With most of those things out of the way, I got back to working on a pretty nifty DownScale....Snarky. It's been on the boards for a couple years. had a time trying to decide what size would give the best balance between size and flying. T3 or T4 seemed the most likely candidates for the major body & Scoop parts. I must say getting the scoop Angle cutting & opeing guides for this small tube was kind of fun. The cutting proved to be challanging but doable.
Basswood was used for all wing & fins. To keep everything as light as possible these were 1/32" thick and tissued for strength. A stock NCB-3AD fliskit nosecone was hollowed out assuming some nose weight would be required as some point. I'm happy to report the model sims to fly without any additional mass. we'll see after the first flight.
Something I did not see (I've never owned a Snarky) was the tiny dorsal scoop fin. Thanks for the Heads up & help with dimensions Keith! This on was added using .005" waferglass (super thin G-10) just to keep it as thin and low mass as possible.
Motor mount shockcord mount is a standard 1" T2+ with two T3/T2+ fibreboard centering rings with beading wire/90lb kevlar Shockline and 1/2"x 9" Green Teflon permanent wadding/streamer. I've allowed the MMT to extend 1/8" from the rear which changes the exterior profile slightly to allow both internal and external friction fitting of the motor. I don't think this minor alteration will adversely effect the look of the model.

To add an experiment to this models Decal sheet. once recreated in CorelDraw-13, they were printed on inkjet Micro-Mark clear decal paper. After printing first coated with Krylon workable Fixatif #1306 then given a single wet coat of Krylon UV resistant Gloss Clear #1305. This test was to see if the water resistance of this process & durabright ink would keep the decal colors from running if trimmed very close to the actual printed lines. I've instantly destroyed other decals by doing this. It seems the Fixatif seals these water resistant Epson Durabright inks even better then Gloss clear as not turned muddy brown while soaking in warm to room temperature water. I still recomment extreme care be taken using inkjet produced waterslide decals by leaving a bit of margin around entire decal images but in this experiment several of these "Printed line edges" were cut without damage.

So heres the next member of the MMWW Fleet. T3 Snarky.
Sorry for the fuzzy pics I'll try to get some better ones.

MM 380p01a_T3 Snarky Topleft_09-15-11.JPG

MM 380uc04_.032in tissued basswood wing&fins_08-16-11.JPG

MM 380uc05_Wings & Fins glued_08-16-11.JPG
 

Attachments

  • MM 380p01b_T3 Snarky Bottomright_09-15-11.JPG
    MM 380p01b_T3 Snarky Bottomright_09-15-11.JPG
    209.3 KB · Views: 15
  • MM 380uc13_CluoseUp .005 Waferglass scoop fin_09-15-11.JPG
    MM 380uc13_CluoseUp .005 Waferglass scoop fin_09-15-11.JPG
    192.8 KB · Views: 16
The ISM was always on my "gotta get around to building one of those ODD-Rocs".. from Way back in the stone ages to the present I've somehow forgotten to add him to my fleet. Until now that is.

Fliskits micro verison ISM has been on my list for some time...I caught a Sale at one of the on-line stores I just couldn't resist and BAM! We had a kit.

As I looked at the little model first I had not realized they were Feather-weight recovery and second they were as tinys as it is.
looking at the raw built model I got to thinking about the Tin man.. then the flat top head sparked images of the Frankensten monster...so hay why not combine some of these.
Heres what I came up with.... I introduce "Frank-In-Space Man" ISM. our 2-faced fly'in friend.

MM 381uc10a-Lg_Close Goofy Face ISM_09-15-11.jpg

MM 381uc10b-Lg_Close Sad Face ISM_09-15-11.jpg

MM 381p01a-Lg_ISM GF Frank-In-Space_09-15-11.jpg

MM 381p01b-Lg_ISM SF Frank-In-Space_09-15-11.jpg
 
Back
Top