SpaceEggs
Rocket Propulsion Engineer
Back in fall 2016, I competed in a rocketry competition at my university where the objective was to carry an egg payload safely with the best apogee. Our team name was SpaceEggs, and naturally we named our rocket the Chicken 9.
The logical extension is of course to make Chicken Heavy, a parallel-staged cluster complete with deploying side cores. And that's exactly what I'm doing.
I am Level 1 certified with NAR (doing L2 attempt very soon) and I wanted a challenge that really forces me to step up my skills in design, construction, and electronics. The design of the CH isn't based exactly on the FH, but moreso on creating a Heavy version of the rocket we originally built for the competition. This forces me to work within some particular constraints, and believe me it was a challenge. The payload isn't an egg this time around, it's a miniature Tesla Roadster.
Self-imposed constraints
* The body tube must be thin wall BT80 and the nose cone must be the PNC80B, these were the supplies given in the competition
* The body tube must be 36" long to match the original Chicken 9
* Tail cone is required, as it was also part of the C9
* The boosters must completely separate in flight while the center core is still under thrust
Is this the easiest way to do it? No.
Will it succeed? Maybe.
Should I have gone for something smaller? Probably.
Am I a madman? Yes.
I should point out that I only recently joined this forum and just now (Feb. 4th) saw Cabernut's BT-60 FH. I haven't taken any inspiration from it, in fact the airframe is completely done as of the time I read his post and most of the design work was done months ago.
The fins are laser-cut from 1/8" acrylic, because that's what we used on the Chicken 9 and because the engineering lab's cutter doesn't do lexan. Why, you may ask, is their shape so bizarre? The guy who made them originally has no idea why but they helped significantly improve our apogee, we think it had to do with aerodynamic interaction with the tailcone.
I used my favorite method to align the fins, which is to half-notch the fins and centering rings for exact radial placement. Also a fin jig helps.

Repeat with side core motor assemblies. After cutting fin slots, I shoved the whole thing in the body tube and secured it with epoxy.
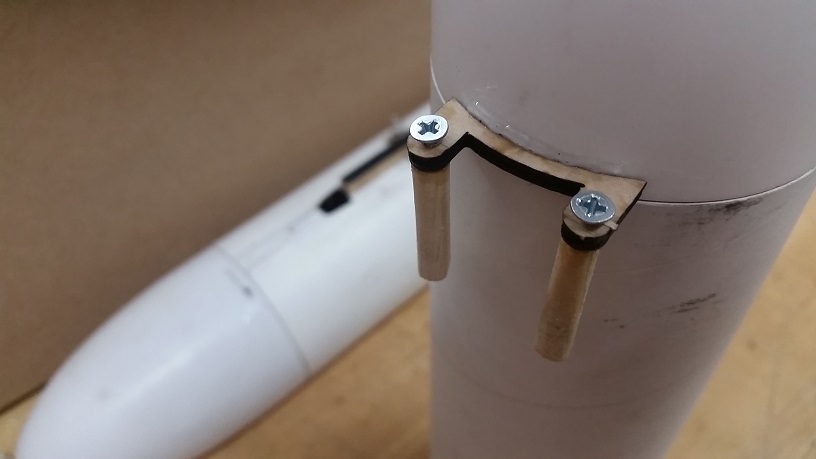
My method of attaching the side cores is just an upscaled version of the booster pod kit. I 3D printed hooks and seats (I don't know what else to call the bottom piece that it sits in) and used them to align the placement of the thrust rods, which transfer the load to the center core. I then epoxied the hooks and seats to the center core.
What I did for the Roadster was cut off the bottom of the nose cone and epoxy in a ring through which the car and its mount fit neatly. Those two are attached to a bulkhead which screws into the ring.
So as of last night, the airframe is complete and the Roadster is securely inside the nose.


My flight plan is to have a slow-burning H45 in the center and two F44's on the sides. About two seconds into flight, the miniTimer4 will fire charges in the boosters, deploying the nose cones and allowing them to fall away under streamer. The center core will continue for about four more seconds before burning out, and the DDC-22 will trigger events at apogee and 600 ft for deployment of a drogue streamer and main 24" chute.
Finding a way to trigger charges in the side cores while not having a permanent connection was an interesting challenge. I decided on using spring connectors that contact copper on the center core. The springs should also provide a small pushing force to encourage booster separation, even if it's only a little bit.
I did learn about the OpenRocket dev version from Cabernut's post, so I made a rough version of the whole stack and it actually validates my sketchy hand calculations saying the rocket is stable.


I fly with NEFAR, and to my knowledge a fully separating rocket like this hasn't been flown there in a long time so this should be an interesting one. I'm going to install an onboard camera as well to capture booster sep. The decorations will be pretty much the same as the original Chicken 9, all hand-designed stickers and decals. I may even add laser cut grid fins and paper model legs.
I appreciate any advice you guys have, since this is my first cluster. If you think this is a disaster waiting to fly... it's too late now, the Chicken Heavy is closer to being done than it was when I started two days ago. In the words of someone who saw it, "God help us."
Chicken 9 album
The logical extension is of course to make Chicken Heavy, a parallel-staged cluster complete with deploying side cores. And that's exactly what I'm doing.
I am Level 1 certified with NAR (doing L2 attempt very soon) and I wanted a challenge that really forces me to step up my skills in design, construction, and electronics. The design of the CH isn't based exactly on the FH, but moreso on creating a Heavy version of the rocket we originally built for the competition. This forces me to work within some particular constraints, and believe me it was a challenge. The payload isn't an egg this time around, it's a miniature Tesla Roadster.
Self-imposed constraints
* The body tube must be thin wall BT80 and the nose cone must be the PNC80B, these were the supplies given in the competition
* The body tube must be 36" long to match the original Chicken 9
* Tail cone is required, as it was also part of the C9
* The boosters must completely separate in flight while the center core is still under thrust
Is this the easiest way to do it? No.
Will it succeed? Maybe.
Should I have gone for something smaller? Probably.
Am I a madman? Yes.
I should point out that I only recently joined this forum and just now (Feb. 4th) saw Cabernut's BT-60 FH. I haven't taken any inspiration from it, in fact the airframe is completely done as of the time I read his post and most of the design work was done months ago.
The fins are laser-cut from 1/8" acrylic, because that's what we used on the Chicken 9 and because the engineering lab's cutter doesn't do lexan. Why, you may ask, is their shape so bizarre? The guy who made them originally has no idea why but they helped significantly improve our apogee, we think it had to do with aerodynamic interaction with the tailcone.
I used my favorite method to align the fins, which is to half-notch the fins and centering rings for exact radial placement. Also a fin jig helps.
Repeat with side core motor assemblies. After cutting fin slots, I shoved the whole thing in the body tube and secured it with epoxy.
My method of attaching the side cores is just an upscaled version of the booster pod kit. I 3D printed hooks and seats (I don't know what else to call the bottom piece that it sits in) and used them to align the placement of the thrust rods, which transfer the load to the center core. I then epoxied the hooks and seats to the center core.
What I did for the Roadster was cut off the bottom of the nose cone and epoxy in a ring through which the car and its mount fit neatly. Those two are attached to a bulkhead which screws into the ring.
So as of last night, the airframe is complete and the Roadster is securely inside the nose.
My flight plan is to have a slow-burning H45 in the center and two F44's on the sides. About two seconds into flight, the miniTimer4 will fire charges in the boosters, deploying the nose cones and allowing them to fall away under streamer. The center core will continue for about four more seconds before burning out, and the DDC-22 will trigger events at apogee and 600 ft for deployment of a drogue streamer and main 24" chute.
Finding a way to trigger charges in the side cores while not having a permanent connection was an interesting challenge. I decided on using spring connectors that contact copper on the center core. The springs should also provide a small pushing force to encourage booster separation, even if it's only a little bit.
I did learn about the OpenRocket dev version from Cabernut's post, so I made a rough version of the whole stack and it actually validates my sketchy hand calculations saying the rocket is stable.
I fly with NEFAR, and to my knowledge a fully separating rocket like this hasn't been flown there in a long time so this should be an interesting one. I'm going to install an onboard camera as well to capture booster sep. The decorations will be pretty much the same as the original Chicken 9, all hand-designed stickers and decals. I may even add laser cut grid fins and paper model legs.
I appreciate any advice you guys have, since this is my first cluster. If you think this is a disaster waiting to fly... it's too late now, the Chicken Heavy is closer to being done than it was when I started two days ago. In the words of someone who saw it, "God help us."
Chicken 9 album